Send data from Salesforce Marketing Cloud to an AWS S3 Buquet

Even though exporting data to FTP is fairly common in Salesforce Marketing Cloud (SFMC), connecting directly to an AWS S3 bucket is less so—and the official documentation on it is quite incomplete. That's why I've put together this short guide to walk you through the entire process.
1. Prepare Your AWS S3 Bucket
Even though, as Salesforce Marketing Cloud Developers, we'll probably have minimumn responsability over the AWS S3 buquet setup, in essence, this is what we need to stablish a connection.
- Create a new S3 bucket.
- In the AWS Console, go to S3 → Create bucket.
- Choose a General Purpose bucket (the default) and give it a name—e.g. sfmc-integration-aws.
- Disable ACLs, block all public access, and enable default encryption with SSE‑S3.
- (Optional) Enable versioning or lifecycle policies if you need them.
- Create a folder for SFMC.
- Within your new bucket, create a folder/key prefix called SFMCIntegration. This keeps your Marketing Cloud files organized.

2. Create an IAM User for SFMC
Next, you need an IAM (Identity and access management) user whose credentials SFMC will use to connect.
- In the AWS Console, go to IAM → Users → Add user.
- Give the user a name (for example, sfmc-s3-user) and select Programmatic access.
- Skip to Permissions—we’ll attach a custom inline policy.

3. Grant Least‑Privilege Permissions
Even though, this is not a requirement, it is a best practice to use the principle of least privilege when granting permissions. Therefore, what will do in this step is create a policy specific to this user that will only allow to put data in the specific buquet that we stablished for it. So, we'll create a new inline policy and in the editor add this peace of code:
       {
	"Version": "2012-10-17",
	"Statement": [
		{
			"Effect": "Allow",
			"Action": [
				"s3:PutObject",
				"s3:ListBucket"
			],
			"Resource": [
				"arn:aws:s3:::sfmc-integration-aws",
				"arn:aws:s3:::sfmc-integration-aws/*"
			]
		}
	]
}
- s3:PutObject – lets SFMC upload files to your bucket.
- s3:ListBucket – lets SFMC list objects (useful in Automation Studio).
Attach this policy to your new user.

4. Create and Store the Access Keys
Finally (at least when it comes to the AWS setup), generate credentials that SFMC will use:
- In IAM → Users, select your sfmc-s3-user.
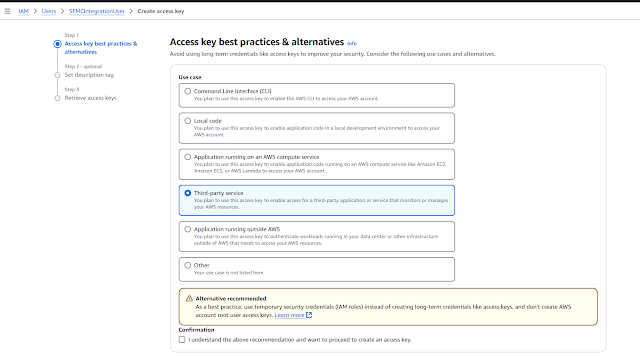
- Under Security credentials, click Create access key.
- Choose Third-party service or application running outside AWS.
- Copy both the Access Key ID and the Secret Access Key—you’ll need both in SFMC, and the secret is shown only once.
5. Configure the File Location in SFMC
Now switch over to Salesforce Marketing Cloud:
- In Setup, navigate to Data Management → File Locations.
- Click Create and choose Amazon Simple Storage Service.
- Fill in the connection details:
- Authorization Type: Access Key
- Bucket Name: sfmc-integration-aws
- Relative Path: SFMCIntegration
- Access Key ID: (from IAM)
- Secret Access Key: (from IAM)
- Region: (e.g., us-east-1 or wherever your bucket lives)
- Click Validate to confirm that SFMC can connect.

All set! We now have a new file location that we can use to send Markating Cloud data to AWS!

Comments
Post a Comment